I can’t believe Thanksgiving is next week! Is it just me, or is the holiday season absolutely flying by this year? Well, before it turns from fall to winter, I have another awesome fall appropriate DIY for you from Smitten on Paper! These sweet twine wrapped table numbers would be great for a wedding any time of the year, but there is a rustic appeal about them that I think makes them especially perfect for fall.
Supplies:
Fresh Cut flowers
Twine/cording
Glue stick
Glue Gun
X-acto
Thick cardboard
Table number print out
Steps:
-Print out your desired table numbers, making sure they are the perfect desired size.
-Using a glue stick, lightly coat the back of the printed sheet and place over the cardboard. This is to ensure the sheet will not move when tracing and cutting over the cardboard. Then let dry.
-Using an X-acto, trace over the number, cutting through the cardboard.
-When your number is finally all cut out, peel back the sheet of paper.
-If your table number has any paper residue left over, not to worry, this will be covered up by twine and will not show through. So now, at the top, tie a knot. This will be your starting point when wrapping.
-Wrap, Wrap, Wrap!
-TADA. Your table number is now ready for beautification.
-Using a glue gun, carefully apply the flowers where you feel they are suited best. And done!
Smitten on Paper is currently offering 30% off all their holiday cards. I got mine from them this year and they are super cute, so don’t miss out on this great deal!

As we are all planning our upcoming Thanksgiving celebrations, I thought this beautiful rustic fall styled shoot, sent over by my friend Annie of Marry You Me, would provide some awesome inspiration! I love how easily wedding inspiration can translate to any event or party. Those pendelton wool blankets used as table linens and caramel dipped pears are definitely going into my Thanksgiving idea file!
Here’s more from Annie about this lovely shoot…
“Fall is a short but beautiful season in Central Oregon, and we wanted to celebrate the gorgeousness of fall and its colors and the best that Bend has to offer – sunny weather, local beers, the outdoors and of course, dogs. We chose historic Hollinshead Park for our shoot because of its orchards, old barns, and the fact that it has a great event barn perfect for weddings.
Working with a team of talented local vendors we wanted something that felt very Bend with a laid-back, natural yet beautiful and memorable feel. The beer bar of all local brews was a must – Bend has the nickname Beer Town USA because of our 14 (and counting) local breweries, and the beer growler filling phenomenon is booming here. Oregon is also known for its fruits and crops so incorporating fresh local fruits like pears, pomegranates and apples into the centerpieces and bouquet by Marry You Me and all of the desserts by Foxtail Bakeshop was important. Using non-floral centerpieces can be a great budget idea and the fruit can double as favors for the guests!
Pendelton wool plaid blankets (also made in Oregon!) adorned the dessert table and served as a table runner, as did Oregon brand fruit cans used for vases and Bend beer pint glasses. Locally made wood tables and benches from O’Brien Events were the perfect rustic touch for seating and have a great handmade feel to them. Fall leaves made for amazing natural decorations all over the ground at the park as well as in the bouquet for a nod to the season. The fall inspired invitations and calligraphed leaf place cards were designed by our model, Nikki Wilkinson of the The Wilkinson Loft. Fall in Central Oregon can be brisk, so a yellow sweater made the perfect and practical accent over the lace Mori Lee dress.”
Vendors:
Photography: Byron Roe Photography
Event Design: Marry You Me
Cake + Desserts: Foxtail Bakeshop
Floral Design: Marry You Me
Rentals: O’Brien Events
Invitations: The Wilkinson Loft
Location: Hollinshead Barn
Wedding Dress: Mori Lee from Bella Brides
Hair + Makeup: Lori for Weddings by Edge Salon
Hair Accessory: Buttons n’ Blossoms

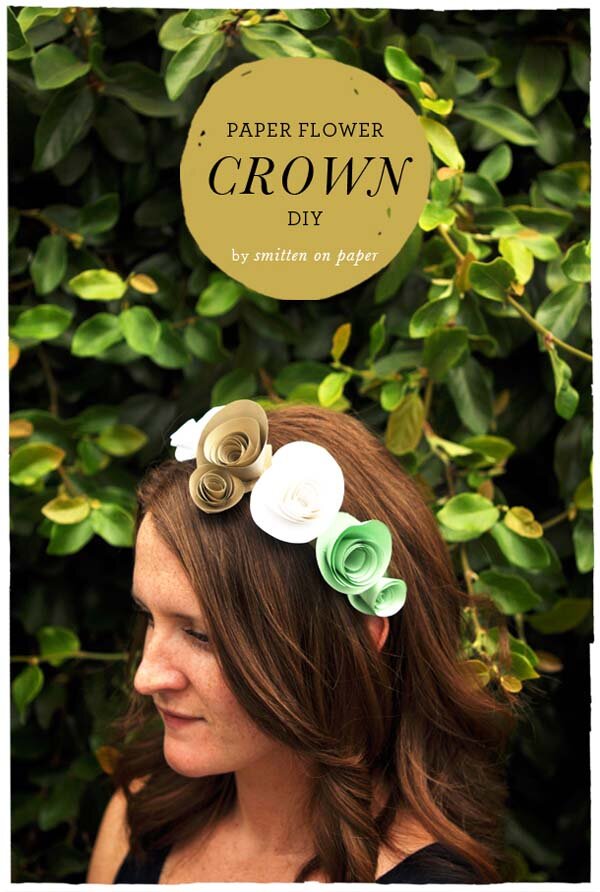
Happy Monday! I have another adorable DIY project from Smitten on Paper to share, and it’s perfect for this sunny Summer day.
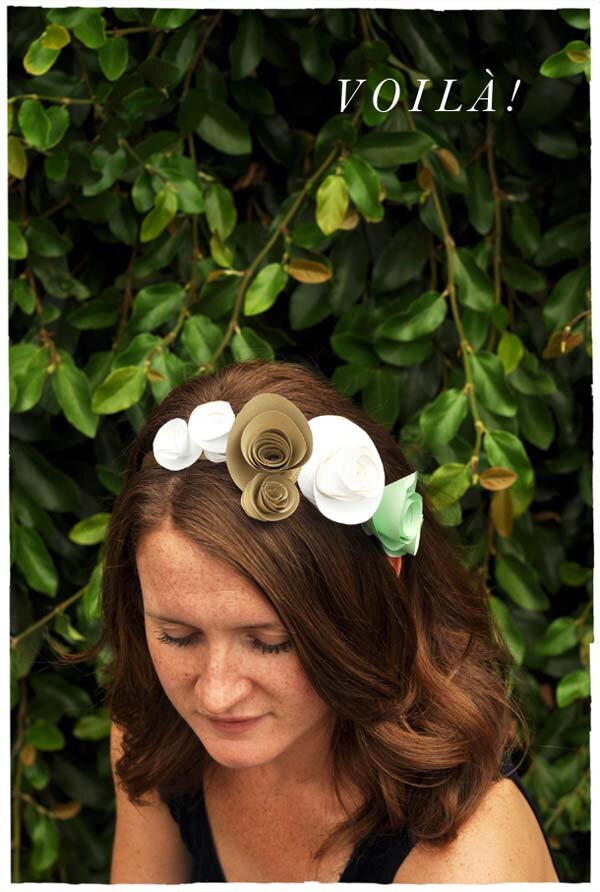
This paper crown is so simple and can be made on the fly with things you probably already have laying around your house. I love the palette of kraft, mint and white they used, but you can use any color combination you prefer!
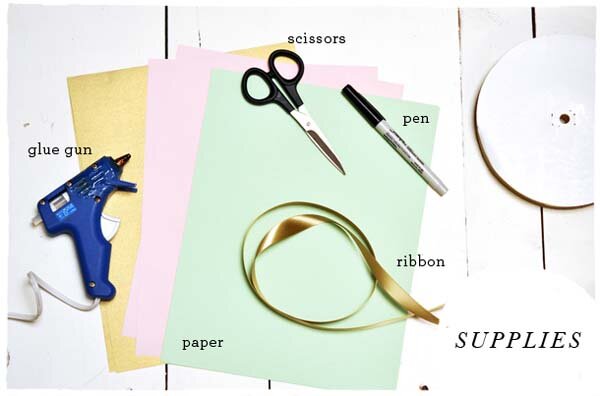
Supplies:
Paper, Scissors, Glue gun, Pen, Ribbon.
Directions:
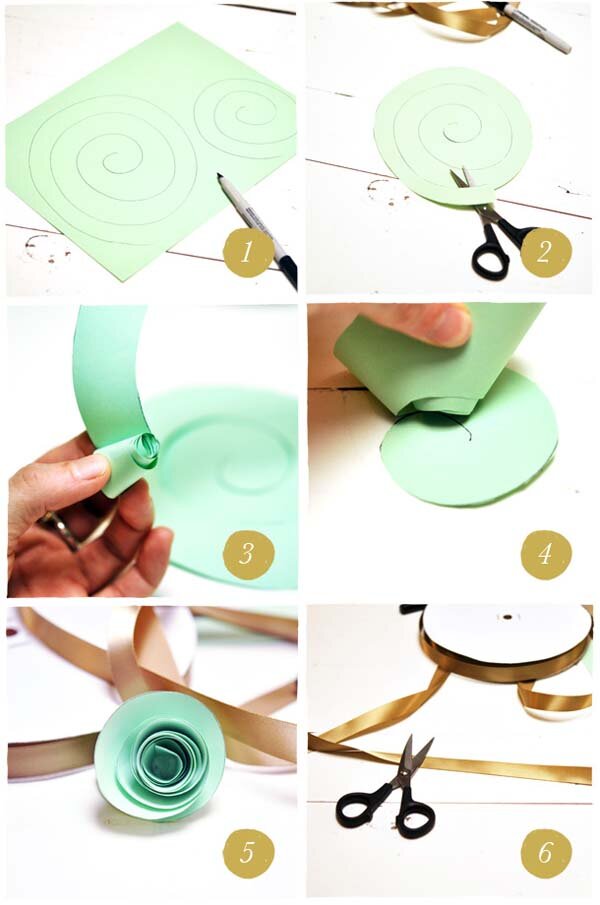
1. Draw a spiral on your paper.
2. Cut along the spiral line (it doesn’t have to be perfect or precise).
3. From the outer end, begin to roll the paper around itself until you get to the center.
4. Once you roll all the way to the center let the paper unroll slightly, settling on it’s own. Place a dot of hot glue onto the bottom center of the spiral and stick the rolled paper down.
5. Repeat with as many flowers as you would like on your crown.
6. Cut a length of ribbon that will fit around your head with enough room to tie a bow. Glue your paper flowers onto the ribbon to complete your crown!
This easy and whimsical crown would be perfect for a bridal shower, bachelorette party or even just a fancy day! Enjoy!
Smitten on Paper is currently offering 15% off wedding invitations through July 31st with the code “SUMMER15″- don’t miss out!

The lovely folks over at Smitten on Paper are back with their second DIY feature for The Loveliest Day- a darling hand-stitched burlap table topper! I am a complete novice when it comes to sewing, but even I could do this. So simple and the result is totally adorable!
Supplies:
Burlap, yarn, silk ribbon in varying sizes, large gauge needle + scissors.
Instructions:
1. Plan out your design and then draw it onto your burlap with a sharpie. It does not need to be perfect, the sharpie will be covered up with your stitching.
2. Thread your needle with the yarn and use a running stitch to complete the basic part of your design.
3-6. To make your flowers, thread your need with the silk ribbon and then make 3-4 stitches in a starburst pattern, depending on how large you want your flower. Tie the ribbon off on the back of the burlap and cut the excess ribbon.
7. To make sure that your petals are nice a pretty the ribbon needs to be flat, not twisted. Place your finger under the ribbon as you are pulling the it through.
8. Repeat with as many colors and sizes of ribbons as you would like!
We used this stitched burlap as table topper or runner, but it would also be adorable as a hanging flag or banner.
Big huge thanks to Smitten on Paper for creating another awesome DIY for us!!! Make sure to check out their website, facebook, + to see more of their amazingness:)


