


It’s finally Thursday, which means it’s almost Friday…hooray! To celebrate it almost being the weekend, but not quite yet, I have a fun little party to share with you! Lane Dittoe and Amanda + Rachel of In the Now Weddings joined up with Bride and Bloom Flowers(who sent me this gem of a shoot!) and a team of other awesome vendors to put together a honeymoon send off party with a little English mod flair! It was complete with tea, mini desserts and a confetti exit. Oh, and a fab herringbone backdrop that I am loving!


Vendors:
Photographer: Lane Dittoe
Event Design: Amanda + Rachel of In the Now Weddings
Venue: In the Now Studios
Makeup: Flawless Faces
Caterer: 24 Carrots
Floral Design: Bride and Bloom Wedding Flowers
Linen: La Tavola Fine Linen
Rentals: Classic Party Rentals
Cheerio, my darlings!
Related Posts


BACK TO TOP
I am so, so, so ridiculously excited about what I have to share with you today. A psychedelic wedding shoot, inspired by the hippie and biker cultures of the late 60s and early 70s, with a modern twist. This idea has been swirling around in my head for a long time, and with the help and talent of an incredible team of creative geniuses, it finally came together!
A big huge super-sized thanks + lots of love to the aforementioned creative geniuses: Erin Hearts Court, Honey & Poppies, Miss Tashina, Pow Wow Vintage Rentals, Adam Hunt, Erica O’Brien Cake Design, Freedom Machinery & Accessories, and Emily Dawn Artistry. Thank you also to the awesome venue, Star Ranch, and our models, Jeff, Tashina, Shannon, and my husband Bryan, who were all total babes.
If you’d like to see more, you can check out our feature over on Green Wedding Shoes, thanks to the lovely Jen!


Photography: Erin Hearts Court
Concept Design and Styling: Melissa Elise Event Design & Styling
Florals and Design: Honey & Poppies
Vintage Rentals and Styling Assistance: Pow Wow Vintage Rentals
Dress Designer and Model: Miss Tashina
Paper Goods: Adam Hunt
Cake: Erica O’Brien Cake Design
Hair and Makeup: Emily Dawn Artistry
Motorcycles: Freedom Machinery & Accessories
Jewelry: Sweet Evie & Jenny Dayco
Venue: Star Ranch
Models: Jeff Leighton, Shannon Lee, Bryan Huber
Tomorrow I will be highlighting a few of my favorite DIY projects from this shoot, including the fringed fabric lanterns and giant fringed LOVE letters that I made, as well as the rad cut out table panel, created by my talented friend Melissa Strukel of Pow Wow Vintage Rentals!
Related Posts
BACK TO TOP
For my husband’s birthday, one of our friends got him the raddest gift- a skull chalkboard by iamhome! For a minute, I was jealous, until I realized it was still going to be in my house.

They would be so much fun as markers at a wedding, or party. Halloween party, anyone? If you are the kind of couple that wants something a bit different, why not mark your photo booth, dessert table, guest book, or anything else with these little beauties?

They come in a variety of vibrant colors. I’m especially fond of the sweet magenta.
They also sell these goat milk skull soaps that I am dying to get my hands on. The perfect gift for a groomsmen, bridesmaid, hostess, or anyone else who is into cool stuff. Cause they are really cool.

Related Posts
BACK TO TOP
A classic, and beautiful color palette- honeycomb + black.

Related Posts
BACK TO TOP
Psychedelic Biker Wedding Shoot DIY…
We are back today with some of the DIY projects from our Psychedelic Biker Wedding Shoot that was shared yesterday here, and on Green Wedding Shoes!
Looking back, I wish I would have taken step-by-step photos for each of these, but in the rush of getting everything finished, I totally failed on doing that. Next time, I promise! But, I still want to give a few instructions on how to recreate some of the decor you saw in our shoot, starting with the chalkboard menu…
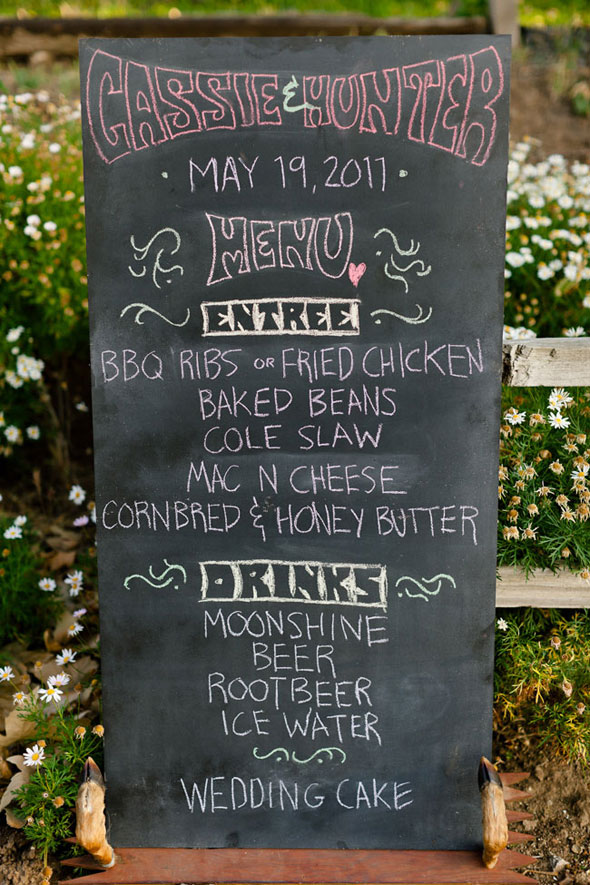
This one is truly simple! Head to your local hardware store and either pick out a pre-cut piece of wood, or get one cut to size. Prime it with a good primer, I use , and wait for it to dry. Coat with a few layers of , I did 4 layers to make sure the white primer I used was totally covered. Wait 3 days, maybe a bit more if you are painting in damp conditions, then cover the board completely with chalk to get a good dust coating, and erase. Now you are ready to go!
Use it for a menu like we did, for your seating chart, welcome sign, or anything else! I used some mounted deer legs my husband had to prop it up, but can simply lean it against a wall, rail, tree, etc. or come up with your own stand.

We wanted to create a unique table top, and were super inspired by the album cover above.
We pulled elements from this album cover to inspire a lot of our design from the shoot, including the table top. We wanted to emulate the look of the folding screen on the album, so I found an awesome fabric with bright, bold colors and a psychedelic pattern, and Melissa of Pow Wow Vintage Rentals created the super rad custom cut-out panel.
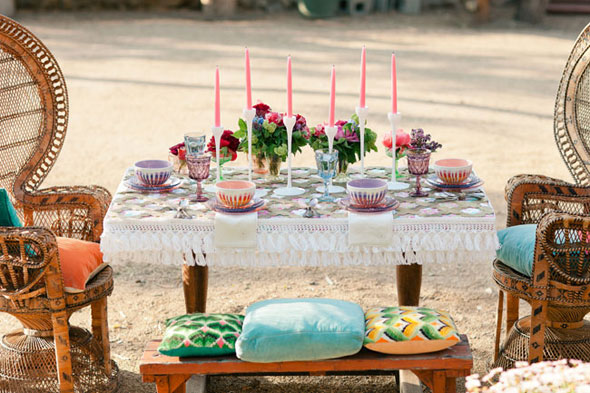
She took a sheet of plastic garden trellis, and used a dremel tool to make the notches that created the pattern we wanted. This would obviously take some skill and time, but I loved that she made something so special out of relatively cheap materials. Afterwards, she spray painted the whole thing a burnished gold.
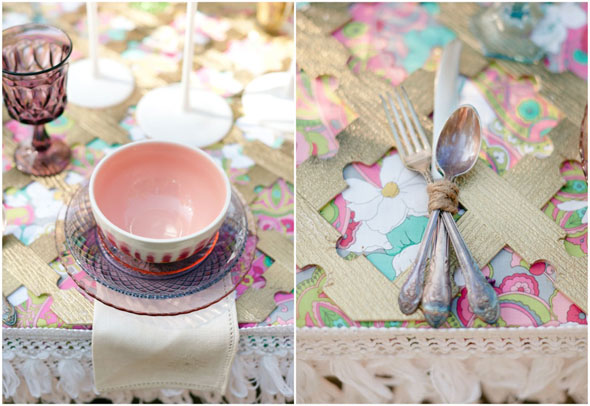
When putting the table together, we laid down the fabric and attached it under the table edge. The edge of the table was adorned with two layers of white fringe trim, the panel was laid on top, and voila! You could also attach the fabric to the panel if you’re unable to attach to the table directly. Even before the flowers, or plates, or candle sticks were put down, we had a table top overflowing with visual interest.

Next is the dreamy cake set-up (on a transformed gallows of all places)!
The flowing fabric tied around the side beams was simply ripped into strips, and tied on. You could use any kind of fabric you want, it’s incredibly easy! Just cut a little starting point with your scissors to make the fabric rip more easily.
The platform was layered with loose pieces of fabric and white fur rugs. I love the texture it gives, and is a great way to temporarily cover up an area that may be less than pretty looking. Fabric remnants are probably the cheapest way to go about it, and they can be re-used for something else later since they don’t need to be cut. An assortment of rugs would also look awesome!
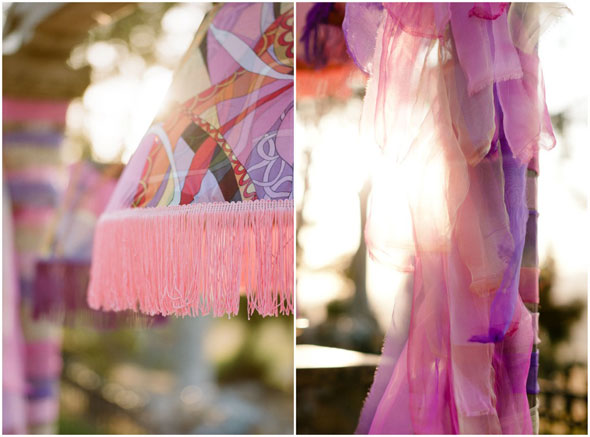
For the lanterns, I bought a few cheap lampshades in differing shapes/sizes, and found a fabric I wanted to cover them with. I simply cut out the fabric and laid it over the lanterns. I made sure there was enough fabric to tuck under the openings on the top and bottom of the shade. I started by hot gluing the fabric ends in the top opening of the lamp. Once they were secured, I started gluing the bottom ends up, making sure to go slowly and keep the fabric ends pulled taut to avoid creases in the fabric. Once it was all glued, I cut out the trim, and hot glued it around the bottom. Since the fabric I used was sheer, I had to cover the shades in two layers so it would be opaque enough. If you are using an opaque fabric, one layer should be perfect!
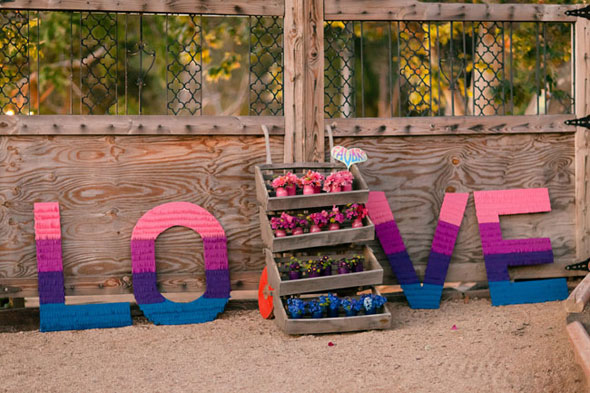
Lastly, the giant fringed fabric LOVE letters. These are pretty simple to make, but take a looooong time! I think the result is worth it though:)
I chose to use a gradient of colors that matched the custom fonts on our paper goods. This made it more complicated than making them all one color, but I love how they turned out. First, choose a font you like, type out the letters you want to use in the largest size you can, then print out(I had one large letter printed per page of paper). Take measurements of each part of the letter, than calculate those dimensions to the size you want your letters to end up. The ones I made were about 4 feet tall. Once you have the dimensions, draw the outline of your letters in pencil on large sheets of cardboard. I used a yard stick to make sure my lines were straight, then cut them out with an x-acto knife.

From there you need to figure out your fabric placement on the letters. Depending on how many different fabrics you are using, use a ruler to make marks of where you want each fabric to start and stop on the letters. I cut my fabric out one strip at a time, so I could measure it and be less wasteful since the letters will require different size strips in different parts. Once I had the strip cut out, I used fringe scissors to cut a fringed end. Start from the bottom of each letter going up, and glue the strips down with hot glue. I cut the strips a bit longer so I could glue them down and fold them over the sides. Make sure to overlap each strip a bit so that the cardboard doesn’t show through.Keep gluing until you are done!
I hope these instructions helped for those of you wanting to try some of these DIY projects! Next time, I will have step-by-step photos as a visual aid:)
Related Posts
BACK TO TOP
While we were on vacation in Mexico last month, I discovered a new found love for otomi textiles. I picked up a table runner in grey, and a pillow case in the most gorgeous coral shade. The table runner is currently adorning our entry table, and the pillow case is soon to be framed and hung up, so I can swoon over it daily.

These breathtaking textiles are handmade by the Otomi Indians from Hidalgo, Mexico. Each piece can take up to a month and a half to be hand embroidered onto the muslin fabric. The designs are inspired by ancient cliff paintings from the region.

The pieces range from $80 to around $500, depending on the size. Well worth it for the craftsmanship!

If you’re not heading down to Mexico anytime soon, no need to fret! You can purchase your own stunning otomi textiles from several sources. L’aviva Home, Jacaranda and Mexican Textiles Museum Store.
I think the otomi designs would make a perfect motif for a Mexican wedding! From the paper goods, to table runners, and more.
Related Posts
BACK TO TOP
A few weeks back, I guest posted for my friend Chris over on Postcards & Pretties, and today I want to share the inspiration I put together with all of you! If I’m being totally honest, I am 110% ready for Fall. Bring on the boots, scarves, changing leaves, and cool weather! No matter how ready I am for Fall though, we are still deep in Summer here in Orange County. It’s 100 degrees today (ew!) and in honor of that, here is some summery sweet, pastel saltwater taffy goodness!

Related Posts
BACK TO TOP


